"Over the router, through the firewall.. 0ff to grandmas house we go..."
By: magikh0e
magikh0e _aT_ ihtb d0t org
'\v/`
(o 0) m0o.
(_) /
Last Edit: Feb 9 2012
Updated: March 2015: Document clean up
Jumping through hoops
Ever heard the expression "I had to jump through hoops to get there"?
With the ever increasing complexness of network topologies and designs, along with the security defenses to protect them. Jumping through hoops
is a fairly common practice in the security world. This paper will examine how to create tunnels into a network using some SSH Gymnastics and
Proxychains. In the end it will cover scanning anonymously using the TOR network and proxychains.
WTF is Proxychains?!?
Proxychains is a tool that can intercept any TCP and/or UDP traffic from a specific process and tunnel it over a proxy.
The proxies supported by proxychains are: HTTP, SOCKS4, and SOCKS5.
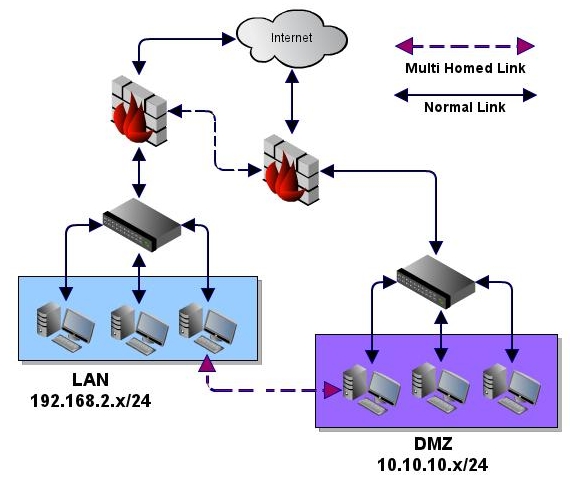
Diagram 1 - Network Overview
Setting up the launch pad
The pivot machine
If you were to target the internal network in the diagram above with only external access, you will have a very limited view into the inside of the
network. Using SSH and proxychains this can be very easily worked around by creating a dynamic port forwarder using SSH on the attackers localhost
and connecting to one of the host(s) you have access to externally via SSH. You first need to create the dynamic listener on attacker machine on a
specific port using the ssh -D option. Once you have established a connection to the remote machine, you will then need to configure proxychains to
use the listening port created for this tunnel in order to access the internal network.
ssh -D 127.0.0.1:9050
Taken from ssh(1)
-D [bind_address:]port
Specifies a local "dynamic" application-level port forwarding.
This works by allocating a socket to listen to port on the local
side, optionally bound to the specified bind_address. Whenever a
connection is made to this port, the connection is forwarded over
the secure channel, and the application protocol is then used to
determine where to connect to from the remote machine. Currently
the SOCKS4 and SOCKS5 protocols are supported, and ssh will act
as a SOCKS server. Only root can forward privileged ports.
Dynamic port forwardings can also be specified in the configura-
tion file.
IPv6 addresses can be specified with an alternative syntax:
[bind_address/]port or by enclosing the address in square brack-
ets. Only the superuser can forward privileged ports. By
default, the local port is bound in accordance with the
GatewayPorts setting. However, an explicit bind_address may be
used to bind the connection to a specific address. The
bind_address of "localhost" indicates that the listening port be
bound for local use only, while an empty address or '*' indicates
that the port should be available from all interfaces.
Configuring proxychains
The proxychains config file is located at: /etc/proxychains.conf. Under the [ProxyList] directive,
make sure you the config file contains the following:
socks4 127.0.0.1 9050Attack Scenario #1:
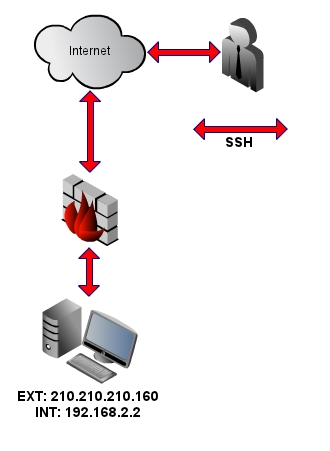
The attacker beings by establishing a connection to 210.210.210.160 on the SSH service. The SSH service has been port-forwarded by the remote
firewall to the internal host at 192.168.2.5. Using the -D option the attacker then creates a local dynamic listener on port 9050 for this
connection.
ssh -D 127.0.0.1:9050 username@210.210.210.160
Diagram 2 - Establishing an SSH session to the pivot machine
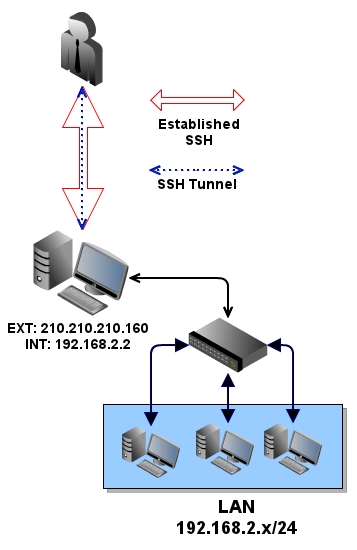
Once the SSH session had been established, the attacker would then have visibility into the network (TCP/UDP). You will then be able to scan machines on
the internal network located at 192.168.2.5 and 192.168.2.10 using the tunnel that has just been created.
proxychains nmap -PN -n -sTV 192.168.2.X -p1-65535
Diagram 3 - Overview of an established tunnel
The machine that you are using as a pivot point does NOT have to straddle the firewall in any sort of way. It either needs layer 2 connectivity into the others or have rules on the firewall
allowing the traffic. In this example, the machines located at 192.168.2.5 and 192.168.2.10 will see the source of the attack as being from 210.210.210.160 or 192.168.2.2.
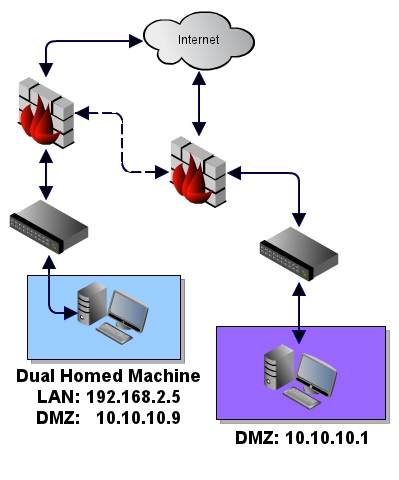
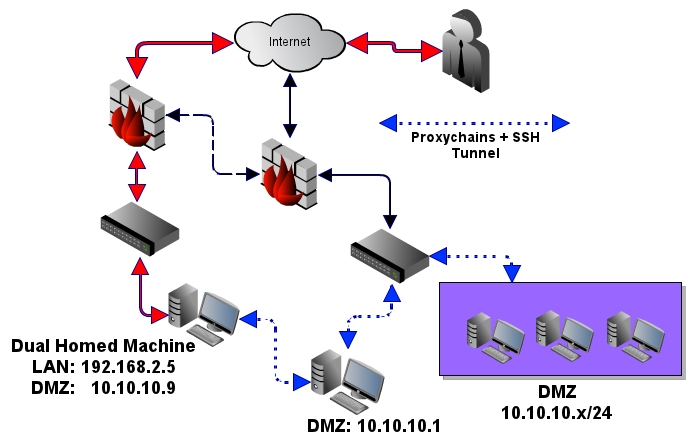
Attack Scenario #2 - The Rabbit hole does go deeper. Setting up advanced tunnelsNote: This works with dual homed host, or host with special rules through a firewall segment.
Diagram 4 - Advanced tunnels using dual homed host(s) overview
Now that you have configure the first basic tunnel, you can now use this tunnel to go deeper into the network. As an example, imagine there was yet another network '10.10.10.0/24' living behind
192.168.2.5, which has been discovered to be a dual homed host on the DMZ network. Using proxy chains we can piggy back the existing tunnel to create a new one into the DMZ network.
proxychains ssh -D 127.0.0.1:9051 USERNAME@10.10.10.1
Once this tunnel is established into the DMZ network, the host at 10.10.10.1 will see the source connection coming from: 192.168.2.2 on the LAN side.
Diagram 5 - Advanced tunnels with dual homed host(s). Example of an established session
Re-cap of what just happened
...
The first step was to create a dynamic listener on the attackers machine listening on port 9050 which gets the connection into 192.168.2.2 via SSH. Then another dynamic listener was created
on the attackers machine listening on port 9051, which has a tunnel into 10.10.10.1. These tunnels can very easily go on and on, as you should et the idea by now. Each port in use should have
it's very own proxychains.conf file. To do so you simply copy the /etc/proxychains.conf into a newly created directory. Ie port9051/. After copying the config file into this directory, you can
then modify proxychains.conf and change the socks4 port.
cat /etc/proxychains.conf | sed "s/127.0.0.1 9050/127.0.0.1 9051/g" > ./proxychains.conf
Proxychains will search for a config file within the current working directory. Once the file has been changed, you can now issue the proxychains command from this directory with whatever
command you choose.
proxychains nmap...