
[ Example CANBus dev stack using a Raspberry Pi ]
In-vehicle Raspberry Pi rig used to run the scripts on the
Car Hacking parent page.  Designed for
permanent JEEP installation: two CAN buses captured simultaneously,
graceful sleep / wake on the vehicle's 12V, survives crank brown-outs,
quiet enough to run unattended for weeks at a time.

This isn't the only way to build an in-vehicle CAN rig — a USB-CAN
dongle on a laptop works fine for a desk session — but each piece
of the stack below addresses a specific failure mode you hit when you
try to leave a Pi in a vehicle long-term.
[ Parts ]
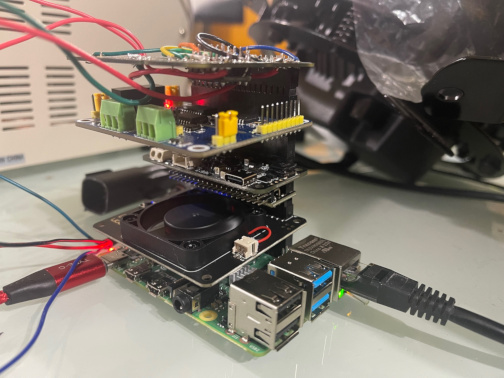
1. Raspberry Pi 4b (2GB)
   Sweet spot for in-vehicle use -- enough CPU for candump on a
   500 kbps CAN-C bus plus a logger running alongside without
   dropping frames.  Pi Zero / Zero 2 W can keep up on CAN-IHS alone
   but bottleneck when both buses see traffic simultaneously.  Pi 5
   works too but draws more current at idle, which matters more
   when you're running off the vehicle's 12V than at a desk.

2. Argon Fan HAT (software-controlled CPU fan)
   Vehicle ambient swings hard -- 130°F+ on a parked-in-sun
   afternoon, sub-freezing in winter.  Software-controlled fan lets
   you ramp by sensor-temp instead of running the fan 24/7.  Quiet
   at idle, loud only when it needs to be.

   Without the fan, the SoC will still automatically throttle to
   keep operating temps within a safe operating range -- but in a
   sealed enclosure on a 130°F dash, throttling will be heavy and
   sustained.  The fan is the difference between full-speed
   logging in summer vs. a 600 MHz Pi that's missing CAN frames.

3. Horizontal GPIO connector
   Stacks the HATs sideways instead of vertically -- better airflow
   over the SoC, lower total profile so the assembly fits under-seat
   or in tighter dash voids.  Optional — vertical stacking still
   works, just hotter and taller.

4. Zero2Go Omni
   The critical piece for in-vehicle work.  See
   Why Zero2Go below for the full rationale.
   Short version: vehicle 12V drops to ~6-8V during crank;
   direct USB-powered Pis brown out and corrupt SD cards.  Zero2Go
   Omni has supercaps for crank ride-through plus clean shutdown
   when the vehicle truly sleeps (drops to <5V for >30s) so the
   Pi flushes its I/O before losing power.  Pairs with
   Blackbox_monitor.sh,
   monitor.sh, and
   autocollect.sh for the
   ignition-tied recorder lifecycle on the software side.

5. Waveshare 2-Channel CAN HAT
   Two MCP2515 controllers -- one for can0 (CAN-IHS at 125 kbps),
   one for can1 (CAN-C at 500 kbps).  Mirrors the topology of a
   real FCA vehicle, so the scripts on the parent page (which
   assume "can0 = IHS, can1 = C") work without modification.
   Single-channel HATs work if you only need one bus.

   The MCP2515 caps out at about 1 Mbps on the SPI side; for
   500 kbps CAN-C bus traffic that's plenty of headroom.  Faster
   CAN FD work would want a different controller.

6. Homebrew Logic Level Converter (3.3V -> 5V)
   The Pi's 3.3V GPIO can't drive 5V data lines on WS2812-style
   RGB strips reliably -- works at short cable runs, gets flaky as
   the data line gets longer.  A 74AHCT125 buffer (or similar)
   shifts 3.3V -> 5V for the data line; the RGB strips in jmccorm's
   rig use this for clean signal at any cable length.

   Not strictly required for CAN work; required if you're driving
   any 5V-data peripherals from the same Pi.

7. 40-pin stacking headers
   Pass the GPIO bus up through each HAT so the stack can grow
   without conflicts -- each HAT reads only the pins it cares
   about.  Standard 2x20 stacking headers off Amazon / Adafruit /
   the Pi Hut work fine.

Total parts run somewhere around $200-250 new (Pi 4 + 2-ch CAN HAT +
Zero2Go Omni + Argon are the load-bearing items).  Buying used
brings it well under $150.  The Python CAN
Bus Lab Guide on the Guides & Tutorials page covers how to
bring up the same software stack on virtual CAN if you want to
develop without the hardware first.
[ Why Zero2Go specifically ]
The Zero2Go Omni is the one piece of this stack that's not substitutable. Three vehicle-specific failure modes it addresses:
1. Crank brown-out Starting the engine pulls hundreds of amps through the starter motor. Vehicle 12V sags to ~6-8V for ~200 ms while this happens. A Pi powered directly off vehicle 12V (via cigarette-lighter adapter or fuse-tap regulator) sees this as an input-voltage undershoot and either resets or browns out mid-write. If the SD card was being written when the brown-out hit, you get filesystem corruption. Zero2Go Omni has supercaps that ride through the dip -- ~200 ms of stored energy is plenty to bridge a crank event without the Pi noticing. 2. Vehicle sleep / clean shutdown When the vehicle is parked and locked, the BCM eventually enters a low-power state and cabin 12V drops below the threshold that Zero2Go considers "running". Zero2Go gives the Pi a configurable grace period (default ~30 seconds) of battery-backed power BEFORE cutting it -- enough for systemd to run shutdown handlers and the SD card to flush. On the software side, autocollect.sh'sengineshutdownhook explicitly callssync; sync; sleep 5; sync; syncto ensure the filesystem is committed before the Zero2Go cuts power. Without the grace period, that hook would never run -- the Pi would just die. 3. Unpredictable power loss Battery disconnect for repair, blown fuse on the accessory circuit, alternator failure during a drive. Same SD-corruption risk as crank brown-out, but unannounced. Same supercap solution -- you get ~200 ms to ~1 s of ride-through depending on the load, which the autocollect engineshutdown hook can use to flush.
Alternatives exist (UPS HATs with LiPo backup, custom DC-DC converter + supercap setups, even a small lead-acid pack), but Zero2Go Omni is the cheapest off-the-shelf solution that's documented to handle all three modes. See the In-Vehicle Event Handlers reference guide for the software-side discipline that pairs with this hardware.
[ Software pairing ]
The hardware above is meaningless without the software that uses it correctly. The natural pairings:
  Hardware feature              Pairs with
  ----------------------------  -----------------------------------
  Zero2Go grace period          Blackbox_monitor.sh   stops the
                                  CAN recorder cleanly on ignition off
                                monitor.sh            top-level
                                  orchestrator -- also does CPU governor
                                  + autocollect + autohvac
                                autocollect.sh        engineshutdown
                                  hook for sync-and-flush

  Waveshare 2-CH HAT            Every script on the parent page that
                                  uses both can0 and can1 (Remote_WiFi,
                                  monitor, autocollect, pyJeepCan, ...)

  Argon fan + CPU governor      Blackbox_monitor.sh /
                                  monitor.sh  switch governor
                                  between powersave (parked) and
                                  ondemand (engine running)

  Logic level converter         RGB strip control (e.g. the
                                  blinker-mirror Python consumer of
                                  lights.sh)

  Generally                     In-Vehicle Event Handlers
                                  reference guide -- covers the
                                  software disciplines that turn this
                                  hardware into a system that survives
                                  weeks of unattended operation