
[ Getting Started with ESP32 Development ]
[ Overview |
Pick a toolchain |
Arduino |
PlatformIO |
Build / flash / monitor |
Libraries & partitions |
OTA |
When it fails ]
[ Overview ]
You have a board and it blinks — the hardware guide got you that far. This
is the other half: the software you write on, and the loop you'll live in every
time you change a line of code.

Nothing here is board-specific. It's the same for a bare WROOM-32 DevKit, an
ESP32-S3, or a Heltec LoRa board — pick a toolchain, install it once, and
the build → flash → monitor cycle is the same for all of them. The point of
this page is to get you past “which of these four things do I install” and into
actually shipping firmware.
[ Pick a toolchain ]
Four real options. They aren't rivals so much as different altitudes — from
“no code at all” up to “the raw SDK.” Pick by what you're building, not by what
sounds hardcore.

  Arduino core   The gentle start. The Arduino API (pinMode, digitalWrite,
                 WiFi.h) on top of Espressif's SDK, with a huge library
                 ecosystem. Every .ino sketch on this site is this. Start
                 here if the board is new to you.
  PlatformIO     The daily driver. A VS Code extension where each project
                 pins its board, framework and libraries in one
                 platformio.ini — reproducible, multi-board, with a
                 built-in monitor and debugger. Grow into this fast.
  ESP-IDF        Espressif's native C SDK (FreeRTOS, idf.py). Every
                 chip feature, full control, a steeper climb. Reach for it
                 when you're squeezing the silicon or shipping a product.
  ESPHome        No C at all — describe the device in YAML and it builds
                 the firmware for you. Perfect for Home Assistant sensors
                 (the BT proxy is this), useless for anything off that rail.

The honest default: start on the Arduino core to learn the chip, and move to
PlatformIO the moment a project has more than one source file or one library.
This guide walks both; ESP-IDF and ESPHome each have their own docs linked at
the end.
[ The Arduino path ]
Two ways in: the Arduino IDE 2.x (a GUI) or arduino-cli (terminal). Same
core underneath.

  1. Install the IDE, then add Espressif's board package. In
     Preferences → Additional boards manager URLs, paste:

       https://espressif.github.io/arduino-esp32/package_esp32_index.json

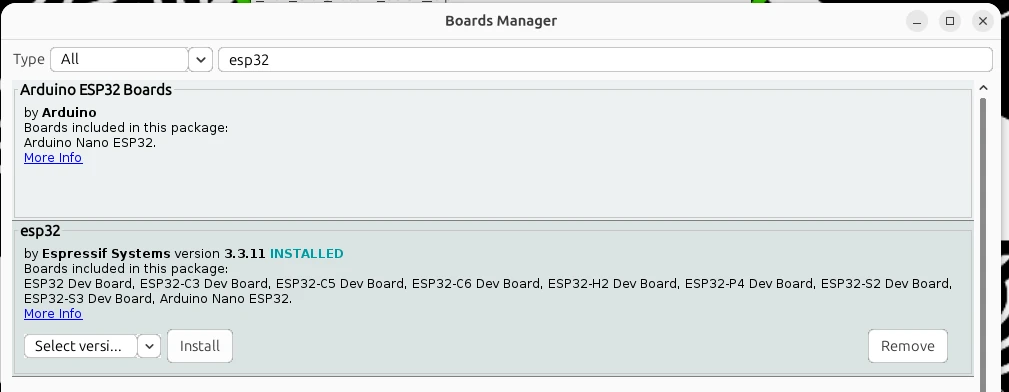
  2. Open Boards Manager, search esp32, and install “esp32 by Espressif
     Systems.” It's a big download — it pulls the whole toolchain and SDK.
  3. Select Tools → Board → ESP32 Dev Module, then pick the serial
     Port (see when flashing fails if none appears).
  4. Open the blink sketch, hit Upload, and watch the LED. That round
     trip — compile, flash, blink — proves the whole chain.
Prefer the terminal? The same thing in arduino-cli:

  arduino-cli core install esp32:esp32
  arduino-cli compile -b esp32:esp32:esp32dev blink
  arduino-cli upload  -b esp32:esp32:esp32dev -p COM5 blink

The IDE is the friendlier place to start; the CLI is what you script later.
[ The PlatformIO path ]
PlatformIO installs as a VS Code extension (search “PlatformIO IDE” in the
extensions panel). The idea that makes it worth the switch: a project is a
folder, and one platformio.ini at its root declares everything — which
chip, which framework, which libraries, at which versions. Commit that file and
anyone rebuilds your firmware the same way.

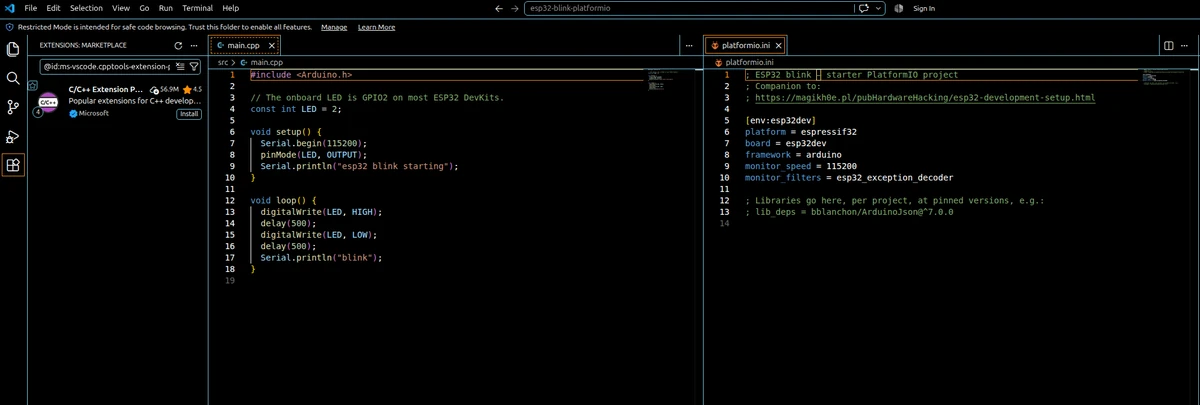
A minimal platformio.ini for the DevKit:

  [env:esp32dev]
  platform = espressif32
  board = esp32dev
  framework = arduino
  monitor_speed = 115200
  lib_deps =
    bblanchon/ArduinoJson@^7.0.0

Your code lives in src/main.cpp. The loop is three commands, from the
terminal or the toolbar buttons:

  pio run                # compile
  pio run -t upload      # compile, then flash over USB
  pio device monitor     # open the serial console at 115200

framework = arduino gives you the exact same API as the Arduino IDE, so every
sketch and library carries over — you've just traded a GUI for a file you can
diff. Swap to framework = espidf the day you want the native SDK.
Don't want to build that scaffold by hand? Here's this exact setup as a
ready-to-open project — unzip it, open the folder in VS Code and PlatformIO
picks it up from the platformio.ini. It's the blink sketch already wired
into src/main.cpp, so pio run -t upload flashes it straight away.
[ Build, flash, monitor ]
Whatever you install, the shape of the work is identical, and you'll run this
loop hundreds of times: edit code, build it, flash it over USB, watch the serial
console, repeat. It's worth knowing what each step actually does.
  — Build compiles your code against the framework into a single
    firmware binary (a .bin).
  — Flash hands that binary to esptool, which every toolchain drives
    underneath. It resets the chip into its ROM bootloader and writes the
    binary to flash over the USB-UART. When you see “Connecting...” or
    “Writing at 0x...”, that's esptool.
  — Monitor opens the serial port so you can read what the board
    prints. The ESP32 boots and logs at 115200 baud — set the monitor to
    match or you'll get gibberish. Your own Serial.println() output lands
    here too.

Two things save hours. First, the boot log: on every reset the ESP32 prints a
banner with the reset reason and, if it crashed, a Guru Meditation Error with
a backtrace. Second, the exception decoder turns that backtrace of raw
addresses into file-and-line numbers — a monitor filter in PlatformIO
(monitor_filters = esp32_exception_decoder) and a menu item in the Arduino
IDE. Turn it on before you need it.
esptool, run directly. That flasher is esptool.py, Espressif's own
tool, and nothing stops you running it yourself — worth doing when the IDE
won't talk to the board, or for jobs no sketch covers. It ships with the
Arduino and PlatformIO toolchains (pip install esptool otherwise), and
finds the port itself (add --port COM5 or /dev/ttyUSB0 to force one):

  esptool.py flash_id
      chip type, flash size and MAC — proves the USB link works
  esptool.py erase_flash
      wipe flash clean; fixes more boot loops than you'd expect
  esptool.py write_flash 0x0 firmware.bin
      flash a prebuilt binary with no IDE in the loop
  esptool.py read_mac
      the board's MAC, for provisioning or allow-lists

erase_flash is the one to reach for first when a board boots to garbage
after an upload, or a library leaves stale data in NVS: it clears the chip, so
the next flash starts from known-empty.
[ Libraries, flash size and partitions ]
Libraries. In the Arduino IDE the Library Manager installs into one
shared folder used by every sketch — convenient until two projects want
different versions. PlatformIO's lib_deps installs per project at pinned
versions, so one project can't break another. Same libraries either way;
PlatformIO just keeps them from colliding.

Flash size. A WROOM-32 DevKit almost always has 4 MB of flash, and it's
not all yours — a partition table carves it into the bootloader, a small NVS
store for settings, one or two app slots for your firmware, and often a
filesystem (LittleFS) for files.

Partitions. You meet them the day you see “Sketch too big.” The default
scheme leaves room for OTA, so your app only gets ~1.2 MB. Two ways out:

  — No over-the-air updates? Pick a single-app scheme and reclaim the space.
    Arduino IDE: Tools → Partition Scheme → Huge APP (3MB No OTA).
    PlatformIO: board_build.partitions = huge_app.csv.
  — Need OTA and a big app? Drop the filesystem, or write a custom
    partition CSV that sizes the slots the way your build needs.

Most first projects never touch this. When one does, it's a one-line change, not
a rewrite.
[ OTA updates ]
Once a board is sealed in a case and stuck on a wall — a sensor node, a
mesh node, the BT proxy — you don't want to unplug it to change code.
OTA (over-the-air) flashing sends new firmware over Wi-Fi instead of USB.

The chip keeps two app slots: it runs one, writes the update into the other, and
swaps on reboot — a bad flash rolls back instead of bricking. That's why the
default partition scheme reserves OTA space. In practice:

  — Arduino: include ArduinoOTA, and the board shows up as a network
    port in the IDE.
  — PlatformIO: set upload_protocol = espota and upload_port to the
    board's IP.
  — ESPHome: OTA is built in and on by default.

One rule: put a password on it (ArduinoOTA.setPassword()). An open OTA
port is a remote-code path onto your LAN — convenient for you, and for anyone
else on the network.
[ When flashing fails ]
The upload step is where beginners lose the most time, and it's nearly always
one of these. Ranked by how often it bites.

  no serial port       The port never appears. Install the USB-UART
                       driver (CP2102 or CH340), and — check this first
                       — swap the USB cable. Charge-only cables have no data
                       lines and are the number-one culprit.
  failed to connect    “Connecting......” then a timeout. The board
                       didn't enter download mode. Hold BOOT, tap EN,
                       release BOOT — or hold BOOT through the
                       “Connecting” dots. Some clones need this every time.
  port is busy         Upload fails while the serial monitor is open.
                       The port is exclusive — close the monitor, flash,
                       reopen it.
  wrong baud           Serial monitor shows garbage. It's set to the
                       wrong speed — the ESP32 logs at 115200.
  brownout / resets    Flash stalls or the board reboots mid-write on a
                       weak USB port or thin cable. Use a rear-panel port or a
                       powered hub, and a cable you trust.
  boots to a loop      Flashes fine, then resets over and over. Usually a
                       code crash (read the backtrace), occasionally a wrong
                       flash-mode/size — leave those at the board defaults.

Work the list top-down and the first two fix it most of the time. The board is
hard to hurt from the USB side; it's the cable and the download-mode dance that
trip everyone.
[ See Also ]
ESP32-WROOM-32: the board # specs, powering, GPIO, and a printable case
Browser ESP32 flasher # flash blink / wifi / BLE demos with no toolchain
ESP32 Bluetooth Proxy # the ESPHome / YAML path, start to finish
Meshtastic Node Build # ESP32 LoRa boards as mesh nodes
PlatformIO docs # platformio.ini reference and CLI
ESP-IDF docs # Espressif's native C SDK