[ Calibrating 3D Printer Filament ]
[ Overview |
The order |
Temperature |
Flow |
Retraction |
Pressure advance |
Beyond the basics |
Save it ]
[ Overview ]
"Recommended: 190–230°C" on the spool label is a range, not a setting.
Every filament + printer + slicer combo lands somewhere different inside it, and
the difference between guessing and dialing it in is stringing, weak layers, and
blobs versus clean prints that just work.

Good news: you do this once per filament, save it as a slicer profile, and
never think about it again. This walks the calibration in the order that
actually matters, with a spool of SUNLU PLA+ 2.0 as the worked example.
[ The order ]
Do these in sequence — each one assumes the previous is already set, so
jumping around means redoing work:

  1. Temperature    the master dial; changes everything else
  2. Flow           how much plastic comes out (extrusion multiplier)
  3. Retraction     kill stringing / oozing between moves
  4. Pressure advance  sharpen corners and seams

OrcaSlicer has all four built in under its Calibration menu, which is the
easy path — but any slicer works if you print the standard test models and
change the setting per test. Reset flow to 100% and pressure advance to 0 before
you start, so the temperature test isn't fighting stale numbers.

On a Creality K2 Plus, its bundled Creality Print slicer is an
OrcaSlicer fork with the same Calibration tab — run all of this there, no
extra install.
[ Temperature ]
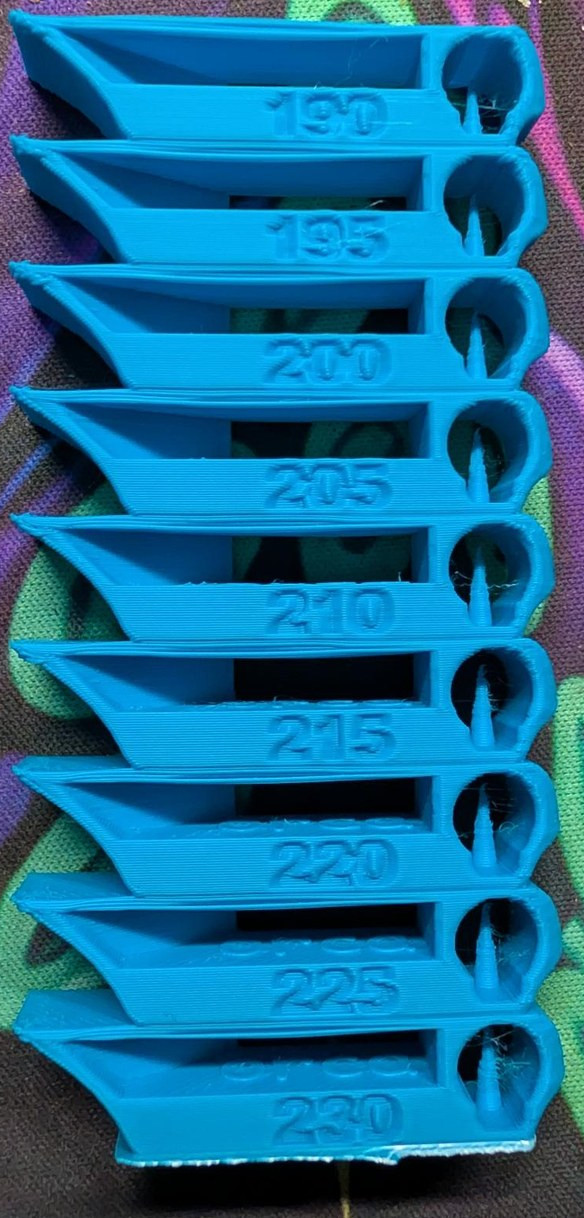
This is the big one — get it right and half your problems vanish. A
temperature tower prints the same shape (overhangs, a bridge, a hole, some
embossed text) over and over, dropping the nozzle temperature a few degrees per
band up the height.

For SUNLU PLA+ 2.0, sweep the whole plausible PLA range: 190 → 230°C in
5° steps. Read the printed tower band by band and pick the hottest one
that still looks clean:

  — overhangs & the bridge — crisp, not drooping or sagging
  — stringing — none of those fine wisps between the towers
  — layer bonding — try to snap a band; it should resist, not crumble
  — surface + text — smooth walls, legible numbers, no blobs

Hotter flows and bonds better but strings and droops; cooler is crisp but
brittle and weakly layered. You want the sweet spot at the hot end that's still
clean — for SUNLU PLA+ that's usually the 205–220°C band; this tower, on a
(fast, hot-running) K2 Plus, landed at 220°C. Read your tower, on your
printer, and let it pick the number.
[ Flow / extrusion multiplier ]
Flow (aka extrusion multiplier) is how much plastic actually comes out versus
what the slicer asked for. Too much and you get rough tops, elephant's foot, and
walls that bulge; too little and you get gaps and weak parts.

Two ways to measure, now that the temperature is locked:

  — OrcaSlicer flow test — prints a pass-1 / pass-2 set of swatches;
    you eyeball the smoothest one and enter its number. Fastest.
  — Single-wall cube — print a cube at one perimeter, no top/bottom,
    and measure the wall with calipers. A 0.4 mm nozzle with a 0.42 mm line
    should measure ~0.42 mm; scale flow to close the gap.

PLA+ is usually close to 100% out of the box — expect a small nudge, not a big
one. Colors and batches shift it slightly (pigment changes the melt), so a quick
single-wall check on a new spool is worth the two minutes.
[ Retraction ]
Retraction pulls the filament back on travel moves so it doesn't ooze a string
across the gap. Tune it with a stringing test (two or more towers with a
gap, or OrcaSlicer's retraction tower) at your dialed-in temperature.

  — Direct drive — start ~0.5–1 mm distance, ~25–40 mm/s speed.
  — Bowden — start ~3–6 mm distance (the long tube needs more).

Raise the distance until the wisps stop, then stop — too much retraction grinds
the filament, causes gaps at seams, and can clog. A little stringing is a
temperature symptom too, so if you can't kill it with retraction, drop the
temp a few degrees and retest. Retraction is a property of the printer, not
the filament, so once it's set it carries to every spool.
[ Pressure advance ]
Pressure advance (Klipper) / linear advance (Marlin) compensates for pressure
building up in the nozzle, so the extruder eases off before corners and seams
instead of over-shooting them. It's the difference between bulged corners with
gaps after them and crisp, even ones.

Run OrcaSlicer's Pressure Advance test (line or pattern method) and read
the value where the corners are sharpest and the extrusion is most even. For PLA
on a direct-drive setup that's typically around 0.02–0.05; Bowden runs
higher. Optional, but it's the step that makes prints look dialed rather than
just fine.
[ Beyond the basics ]
Two more tests round it out — both filament- and printer-specific, both in the
same Calibration menu:

  — Max volume flow — the fastest the hotend can actually melt this
    filament (mm³/s). The test ramps flow up a model until quality drops; the
    number caps your speeds so fast prints don't under-extrude. This spool is
    set to 12 mm³/s; Creality's PLA example lands ~15.
  — VFA (vertical fine artifacts / ringing) — ramps the outer-wall
    speed and shows where the printer's low-speed resonance disappears.
    Creality's example clears up around 100 mm/s, so they set outer walls ≥100.

Creality's own calibration tutorial walks both with worked numbers — and,
for what it's worth, its PLA temperature example independently lands on 220°C.
[ Save it ]
Fold every number into a slicer filament profile named for the spool so you
never do this again. Here's the one from this example — SUNLU PLA+ 2.0 on a
Creality K2 Plus, 0.4 mm nozzle:

  nozzle temp        220°C  (initial layer + rest)
  bed temp           55°C
  flow ratio         1.0   (PLA+ landed on stock — no flow tweak)
  retraction         0.8 mm + 0.4 mm z-hop, 1 mm min travel  (printer)
  max volumetric     12 mm³/s
  part cooling       100%
  pressure advance   left at the K2 Plus firmware default

A fast CoreXY like the K2 Plus runs hotter (220°C here) than a slow bedslinger
would for the same spool — so read your tower, don't copy the number.

From here every model you print — including the enclosures and cases on this
site — comes out with the same clean, tuned result. Recalibrate only when you
switch brand or material; a new spool of the same stuff just needs the quick
flow check.
[ See Also ]
WisBlock Case Generator # a parametric case to print once you're dialed in
ESP32 Getting Started # comes with a printable dev-board case
K2 Plus HA Dashboard # watch the printer from Home Assistant
OrcaSlicer # built-in calibration tests for all four steps
Creality calibration tutorial # Creality's own walk-through (Creality Print / K2 Plus)