
[ Living Off-Grid ]
[ Overview ]
Off-grid living comes down to three budgets that feed each other: power
(watt-hours), water (gallons), and fuel (propane, mostly). Every appliance
draws on one or more of them, and the places they cross are where it gets
interesting. The 12V pump that pressurizes my shower spends watt-hours to move
gallons, and the heater at the end of that line burns propane to warm them.

Get those three right and off-grid is comfortable. Get them wrong and you're
cold, in the dark, or hauling water by hand. I start with power, because
nothing else runs without it, then go deep on the one system people always
underestimate: hot water and a real shower.

I keep adding to this page. Right now it covers power, my hot-water shower
loop, and a biosand water filter. Cooking, refrigeration, heat, and
connectivity get their own sections as I build and document them.
[ Power: the foundation ]
Power comes first, because every other system leans on it, and I've already
written guides for each piece. Here's how they fit together:

  — Generation. Solar is the default: silent, no moving parts, and it
    tops up while you're out. Sizing an array, series vs parallel wiring,
    and choosing a PWM or MPPT controller are all in Solar Power Basics.
  — Storage. A battery bank is where that solar actually lives, and lithium
    (LiFePO4) is the modern answer: light, deep-cycling, and flat under load.
    Size a pack with the Battery Pack Calculator, then build and protect it
    with the Daly BMS or 5S BMS guides.
  — Distribution. Most off-grid loads are 12V DC straight off the battery:
    lights, fans, and the water pump below. Fuse every branch at the battery
    and size the wire to the fuse, not to the load. The tool-battery guide
    walks through the same fusing logic on a smaller pack.

What ties it together is the energy budget: add up the watt-hours
everything draws in a day, then build generation and storage to cover it,
with margin for a cloudy week. The water pump is a small line on that budget,
but it's the line between you and a hot shower, so it earns its watt-hours.
[ Hot water & a real shower ]
This is the system people skip and then regret. A hot shower off-grid
doesn't take much, just four cheap parts in a line:

  reservoir  →  12V pump  →  propane tankless heater  →  shower head

Cold water sits in a reservoir (a tank, a jug, a bladder, even a clean bucket).
A 12V pump pulls from it and pushes pressurized water through a propane
tankless heater, which fires only while water is moving and heats it on the
way through. Out the far end is an ordinary shower head. There's no tank of
hot water sitting around losing heat and no waiting, and the whole thing runs
off a battery and a propane cylinder.
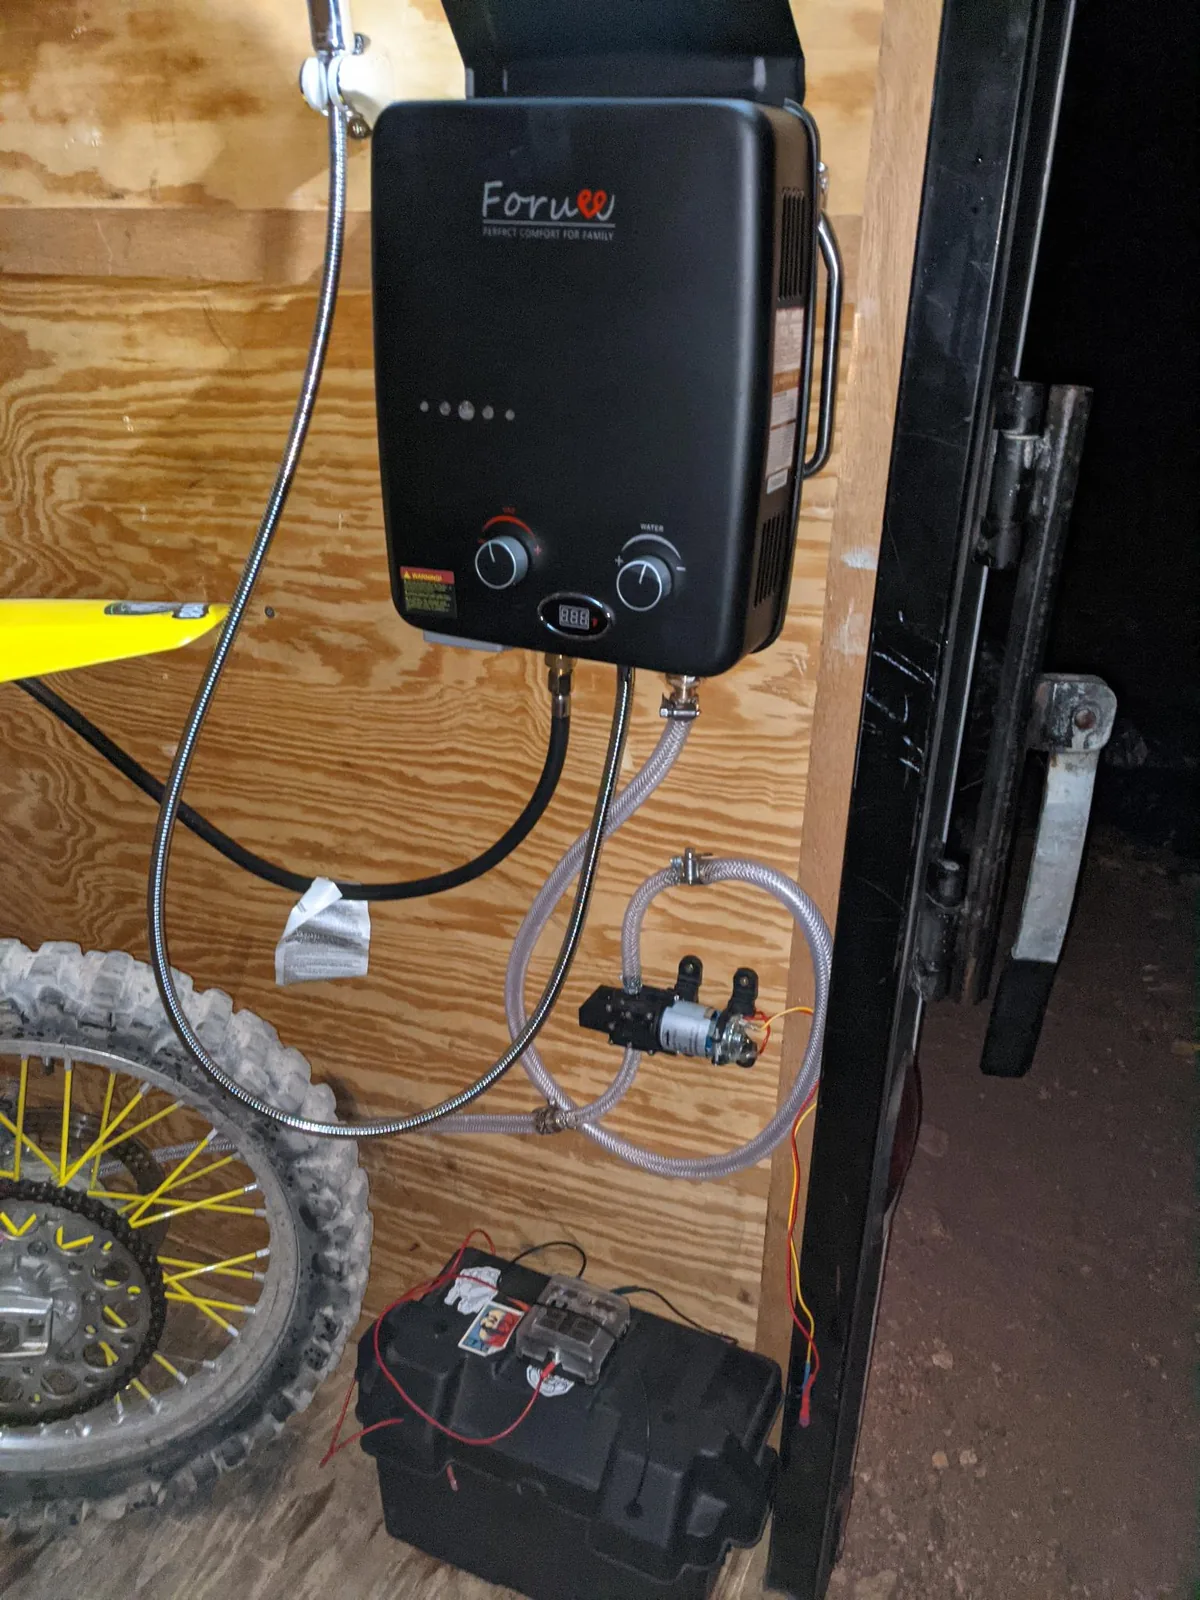
Why the pump isn't optional. A tankless heater needs a minimum flow and a
minimum pressure before it'll fire its burner, typically around 0.4–0.6 GPM
and a few PSI. Gravity from a reservoir a couple of feet up only dribbles and
never reaches that threshold, so the burner never lights. The 12V pump is what
makes the heater behave as if it's plumbed into a house.

The pump. A 12V diaphragm pump, the RV or marine kind (think Shurflo or a
clone), is the right tool. Two numbers matter:

  — Flow (GPM). Match or beat the heater's activation flow, with margin. A
    pump rated 1.0–1.5 GPM comfortably fires a small tankless and still gives
    a real shower stream. With too little flow, the burner stutters or cuts
    out.
  — Pressure and the switch. These pumps have a built-in pressure switch:
    they run until the line reaches cut-off (30–45 PSI), then stop. Open the
    shower valve and the pressure drops, so the pump runs; close it and the
    pump stops on its own. That's your on/off, and it needs no relay.

Wire the pump like any other 12V branch off the battery: a fuse at the battery
end sized just above the pump's running current (a 4–6A pump wants a ~7.5A
fuse), wire gauge sized to that fuse, and a switch on the positive leg if you
want to kill it fully. It's the same fusing logic as every other 12V load in
the tool-battery and DIY pack guides.

The heater. A propane tankless (on-demand) heater is rated by temperature
rise at a given flow, not by one "hot" number. It lifts the incoming water by
so many degrees, so how hot the output gets depends on how cold the input is
and how fast it flows:

  — Cold groundwater in winter gives less rise at the same flow, so you
    turn the flow down for the same output temperature, or turn the gas up.
    Reservoir water that's sat in the sun all day needs almost no help.
  — Water on before gas, off after. Flow proves first, then the burner
    lights. Never light a tankless dry.
  — Hard water scales the heat exchanger. If your source is hard, flush the
    heater with vinegar now and then.

The reservoir. Size it per shower, not per day. A genuinely quick off-grid
shower is 2–4 gallons; a generous one is 5–7. A 7-gallon jug is one good
shower or two quick ones. Keep the inlet screened so grit never reaches the
pump or the heater, and keep the reservoir where a self-priming pump can
actually draw from it.
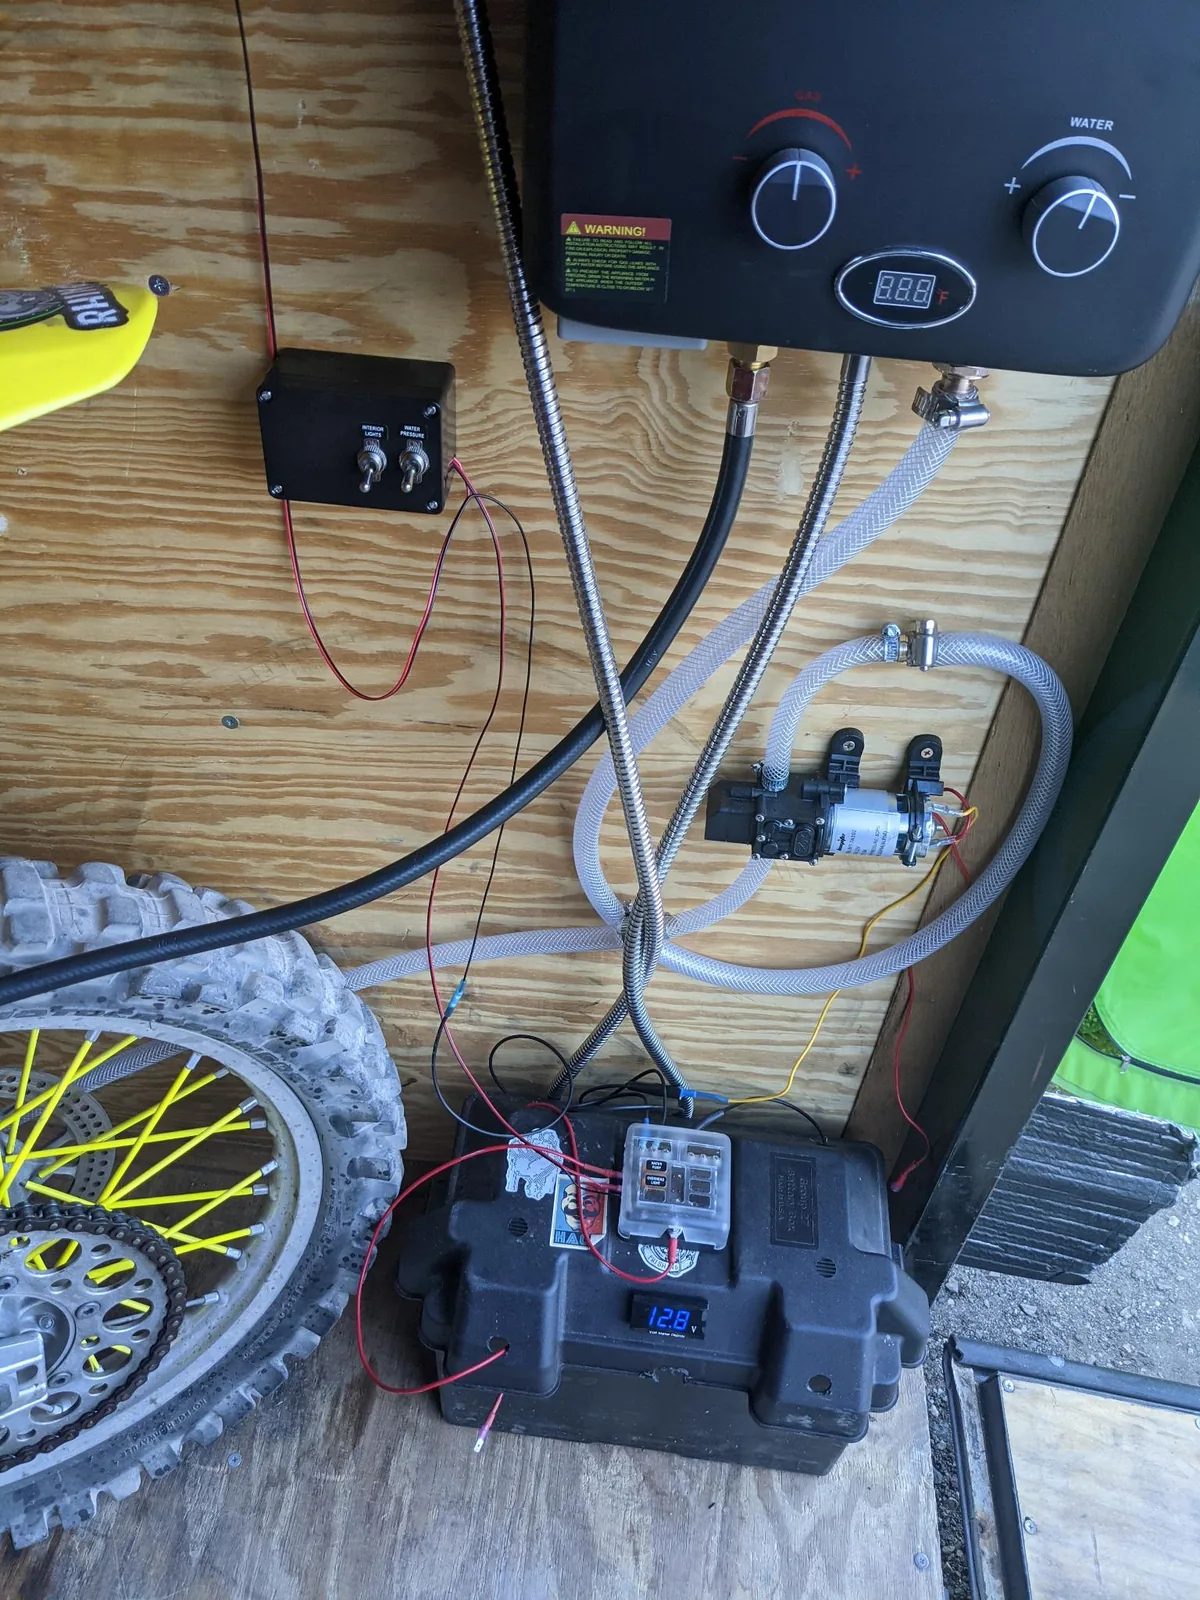
My build, the one in these photos. It lives in my enclosed toy-hauler
trailer, sharing the space with my dirt bike:

  heater      Foruee propane tankless, GAS + WATER knobs, digital temp
  pump        12V diaphragm pump, on-demand pressure switch
  power       marine battery box, 12.8V on the meter, 6-slot fuse block
  switching   a WATER PRESSURE panel toggle cuts the pump; its own pressure
              switch handles on-demand shut-off at the shower valve
  shower      braided hose and head off the heater's hot outlet

The heater's own warning label spells out the two rules that matter most:
check every gas joint with soapy water, and drain the unit before it can
freeze. The propane isn't connected in these photos. When I run it, the ramp
door is fully open and I treat the space as open air. Read the safety section
before you copy any of it.
[ Clean water: a biosand filter ]
The shower loop above assumes you already have water. A biosand filter is
how you make questionable water usable: a barrel of sand and gravel with a
living biolayer on top that eats pathogens as the water trickles through.
It takes no power, no cartridges and no moving parts. It's the household
version of the slow sand filters that treat whole towns, shrunk to a drum you
can build in an afternoon.

What it does, and what it doesn't. Be honest about this before you trust it
with your gut:

  — Removes most bacteria, protozoa (Giardia, Cryptosporidium), worms, and
    the turbidity that makes water cloudy. A ripe filter clears most viruses
    too, though not every last one.
  — Doesn't remove salt, dissolved chemicals, heavy metals, or fuel, and it
    leaves no disinfectant behind. It's a filter: it won't desalinate
    anything, and it won't fix chemistry.

Treat it as the middle of a chain, not the end of one:

  murky source  ─►  biosand filter  ─►  disinfect  ─►  safe to drink

The filter takes out the germs and the cloudiness; the disinfection step (a
few drops of bleach, a rolling boil, or a UV pen) mops up the viruses it
misses. For washing, laundry, and flushing, water straight off the spout is
fine. For anything you swallow, finish it, and don't skip that just because
the water looks clear.
How it goes together. Top to bottom, here's what's in the barrel:

  standing water    ~5 cm on top; if it ever drains dry, the biolayer
                    starves and dies
  biolayer          the living skin at the sand surface; forms over 1-3
                    weeks and does the actual work
  fine sand         40-55 cm, the filtration bed; wash it until the
                    rinse water runs clear
  separating gravel ~5 cm; stops sand migrating down into the drainage
  drainage gravel   ~5 cm of coarse gravel; feeds the outlet
  outlet            a tube from the bottom, up the outside, to a spout
                    set ~5 cm above the finished sand

The outlet spout's height is the whole trick. Because the spout sits about
5 cm above the top of the sand, water only ever drains down to that line and
then stops, leaving the biolayer wet between uses. Set it too low and you
drain the biolayer; too high and the top floods.

Building it:

  1. Container. A food-grade barrel or a concrete cast, opaque so light
     doesn't grow algae inside.
  2. Plumb the outlet from the bottom drainage layer, up the outside, ending
     in a spout ~5 cm above where the sand will finish.
  3. Wash the media obsessively. Rinse sand and gravel until the water runs
     clear. Unwashed fines are the number-one reason a filter runs muddy.
  4. Layer it in: drainage gravel, separating gravel, then the fine sand,
     poured in under water so no air pockets get trapped.
  5. Add a diffuser, a perforated plate or basin above the water, so pouring
     doesn't gouge the biolayer.
  6. Ripen it. Run water through daily for 1-3 weeks so the biolayer
     establishes before you rely on it.

Living with it. Pour a batch in, collect the clear water, then leave it.
The pause between batches, an hour to a day or two, is when the biolayer
feeds and stays healthy, so on-and-off household use is exactly what it
wants. When the flow slows, swirl the standing water and scoop off the dirty
top without digging into the sand, then let it re-ripen for a few days. Keep
it above freezing, like the rest of the water system.
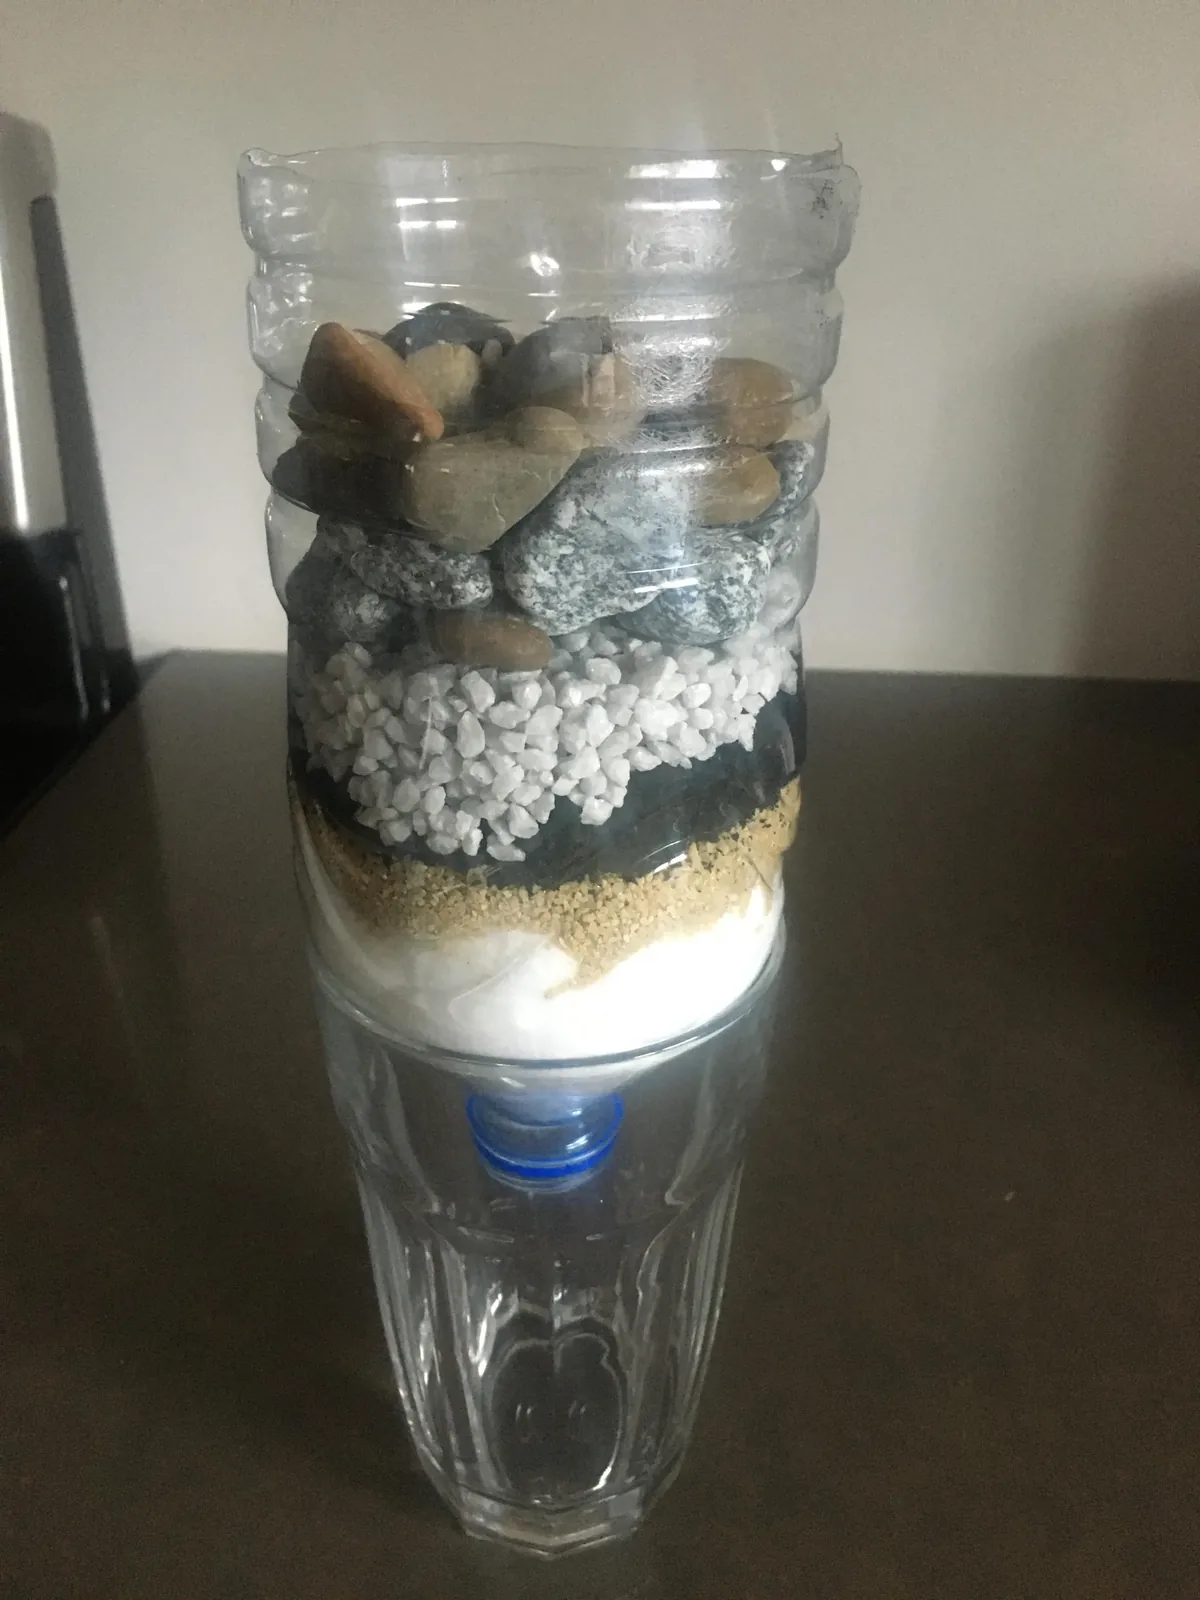
The bottle version is a demo, not the real thing. The classic cut-bottle
filter (pebbles over gravel over charcoal over coarse then fine sand, with a
cotton plug at the neck) is a good way to see the layering, and to knock the
mud and some taste out of water in a pinch. But it isn't a biosand filter: it
has no standing water and no established biolayer, so it doesn't do the
biological pathogen removal that makes a real filter worth trusting. Use it
to understand the layers or as a rough sediment pre-filter, and still
disinfect anything you plan to drink.
[ Safety ]
This setup has two ways to hurt you that the solar and battery guides don't:
combustion and scalding. You already know the electrical side from the
pack guides. Take the combustion part seriously, because it's the one that
kills people quietly.

Carbon monoxide is the real danger. A propane tankless heater burns a flame
and produces carbon monoxide. CO is colorless and odorless, and it can
kill you before you know it's in the room.

  — Never run a propane tankless in an enclosed space. Not a closed
    bathroom, not a tent, not a van with the doors shut, not a garage. These
    units are outdoor-rated for a reason, and "cracked a window" isn't
    ventilation.
  — Mount the heater outside the shower space, in open air, and run the hose
    to the shower head. You wash where the water is, not where the flame is.
  — Put a CO detector in any sleeping or living space that shares air with
    the heater. A battery CO alarm costs a few dollars, and it's the cheapest
    life insurance you'll ever buy.

Propane handling. Treat the fuel with the same respect.

  — Leak-check every connection with soapy water when you set up. Bubbles
    mean a leak, and a leak means you stop and fix it before you light
    anything.
  — Use the regulator that came with the heater. Don't plumb a heater
    straight onto a high-pressure tank.
  — Store cylinders upright and outside, away from sparks and heat. Propane
    is heavier than air and pools in low spots, so never keep a cylinder in a
    below-deck or sunken space.

Scalding. A tankless with the gas up and the flow down can put out water hot
enough to burn. Set the temperature with your hand in the stream, not your
body, and remember that turning the flow down makes the output hotter, the
opposite of a house tap.

Water and winter. Two smaller ones:

  — Freeze protection. Water left in the pump and heater will freeze and
    crack them. Drain the loop, or blow it out, before a hard freeze.
  — Potability. This loop is for washing. If the reservoir isn't potable
    water, keep it clearly separate from anything you drink and never
    cross-connect the two.
[ FAQ ]
Do I really need a pump, or can gravity feed the heater?
You need a pump. A tankless heater has to see a minimum flow and pressure,
around 0.4–0.6 GPM and a few PSI, before the burner fires. Gravity from a
reservoir a couple of feet up only dribbles and never reaches that threshold.
A 12V diaphragm pump pressurizes the line so the heater behaves as if it's
plumbed into a house.

What size 12V pump do I need?
A 12V diaphragm pump (RV or marine, a Shurflo or a clone) rated about 1.0–1.5
GPM fires a small tankless and gives a real shower stream. Its built-in
pressure switch runs the pump until you close the valve, then stops it, so it
needs no relay. Fuse it at the battery just above its running current.

Is it safe to use a propane tankless in a bathroom or tent?
No. It burns a flame and produces carbon monoxide, which is colorless,
odorless and deadly. These units are outdoor-rated and have to run in open
air, never a closed bathroom, tent, van or garage. Mount the heater outside,
run the hose in, and keep a CO detector in any space that shares air with it.

How much water does an off-grid shower use?
A quick shower is 2–4 gallons; a generous one is 5–7. A 7-gallon reservoir is
one good shower or two quick ones. Size the reservoir per shower, not per day,
and screen the pump inlet so grit never reaches the pump or heater.

How do I power the water pump off-grid?
It's a normal 12V DC branch straight off the battery bank, like your lights
and fans. Fuse it at the battery just above the pump's running current (a
4–6A pump wants roughly a 7.5A fuse), size the wire to that fuse, and add a
switch on the positive leg. It's the same fusing logic as the battery pack
and tool-battery guides.

Is biosand-filtered water safe to drink?
Not on its own. It removes most bacteria, protozoa, worms, and turbidity, and
a ripe filter clears most viruses, but it leaves no disinfectant behind and
doesn't remove salt or dissolved chemicals. For drinking, finish it with a
disinfection step: a few drops of bleach, a rolling boil, or a UV pen. For
washing and laundry, straight off the spout is fine.

How long before a biosand filter works?
One to three weeks. The biolayer, the living skin of microorganisms at the top
of the sand that does most of the pathogen removal, has to establish first.
Run water through daily during that time, and always keep about 5 cm of
standing water on top so the biolayer never dries out and dies.
[ See Also ]
Solar Power Basics # generation: sizing an array and picking a controller
Battery Pack Calculator # storage: size the bank that runs everything here
Wiring a Daly BMS (12V) # build and protect the 12V pack the pump runs off
Using a Power-Tool Battery # the same 12V fusing logic on a bought pack
Using a Basic Multimeter # check the pump wiring and battery voltage
Meshtastic Node Build # connectivity: off-grid comms with no cell signal